2. Talk to me
Published on 16 June 2016
A series of posts exploring the possibilities of using the Pi Zero as a USB MIDI device. The previous post was "play us a tune" and the next is "Two things at once".
At the end of the last post we had a Pi Zero that would send a MIDI file over the USB port to an attached computer causing an audio program, in this Apple Garageband to play out a tune. The computer also provides power over the same USB cable so it's all plug-and-play.
This post focusses on being able to talk to the Pi Zero over a serial connection and get it to behave as a USB MIDI Gadget.
Swapping behaviours
The main issue is that the USB port can be configured to be either an ethernet cable—so it can be controlled, or a MIDI interface—so it can send MIDI commands but not both.
This led to the merry dance of:
- booting in ethernet mode and writing some code
- setting the Pi Zero to enter MIDI mode on boot
- rebooting
- seeing if the MIDI commands were working
- setting the Pi Zero to boot into Ethernet mode
- rebooting
- looking at logs written to disk, fixing whatever was wrong with the program
- setting the Pi Zero to enter MIDI mode on boot
- rebooting
- etc etc
This loop is really frustrating so what we want next is a way to control the Pi Zero and be able to control MIDI messages at the same time.
Talking over serial
The Pi's GPIO pins can be used as a serial interface and in fact, when you boot it up it's sending serial data about the boot sequence already. Using a USB-TTL/UART cable you can log into the Pi over the serial GPIO interface whilst the USB interface is pretending to be a MIDI device.
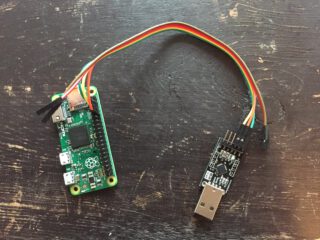
Adafruit sell this one and the one I used looks more like this.
The USB-TTL convertor has the a few wires but only 3 of them need to be connected.
This table shows how:
| UART | Pi Zero GPIO |
|---|---|
| GND | GND |
| TX output pin | RXD pin 10 on GPIO header |
| RX input pin | TXD pin 8 on GPIO header |
Make sure that TX on the Pi goes to RX on the cable and vice vera. I lost a lot of time wondering why it didn't work because I'd connected TX to TX and RX to RX.
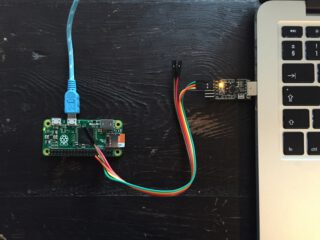
With the cable connected to the Pi Zero's GPIO pins as above and the other end plugged into a USB port on my laptop I used the following terminal command:
screen /dev/tty.SLAB_USBtoUART 115200
At first I saw a blank screen, but hitting enter displayed the familiar login prompt for the Pi. Entering the password will give you the usual terminal access to the Pi.
If the Pi Zero is set to g_midi and the USB cable is plugged in to the computer, running the following will start playing MIDI from the previous post:
aplaymidi --port 16:0 /boot/test.midCtl-C will stop the MIDI playing.
This is quite powerful as it shortens the write-test-debug loop and it lets me see any log messages and make changes as the code is running.
Some useful commands when using screen as Ctl-A d (hold control, press-A, release control, then press d) will detach the terminal from the session but will keep the connection open in the background. screen -r will re-attach to the session. Ctl-A c will close the session completely.
Talking to the outside world
This approach has one major drawback. The Pi Zero can talk to your computer but not the network. The trick of Internet Sharing in the previous post doesn't work because communication is happening over serial and not the virtual ethernet bridge.
There is a way to do it but it took me hours to get it working and felt like travelling back in time to the internet past.
The solution is to use Point-to-Point Protocol, that thing we used to connect modems to our ISP, to bridge the Pi Zero serial connection to the network.
There were some good articles written about this that I used as a starting point:
- Share Internet to the Raspberry Pi Zero
- Connect the Raspberry Pi to network using UART
- Setup a VPN server with El Capitan server 10.11
- pppd manpage
On the Pi Zero:
These steps need the internet, so I enabled g_ether and connected to the Pi Zero with Internet Sharing.
1. Install PPP
sudo apt-get install ppp -y2. Create PPP config
I created a config file sudo nano /etc/ppp/options.ttyAMA0 with the contents:
noauth
nocrtscts
xonxoff
passive
local
maxfail 0
defaultroute
persist
nodetach
192.168.0.101:192.168.0.100
This would create a PPP connection giving the Pi Zero the IP 192.168.0.101 and connecting to the laptop which will be 192.168.0.100.
3. Start PPP on boot
cd /etc/systemd/system/
sudo nano rpippp.service
I put the following in rpippp.service:
Description=PPP
[Service]
Type=idle
ExecStart=/usr/sbin/pppd -d /dev/ttyAMA0 1000000
Restart=always
[Install]
WantedBy=multi-user.target
Alias=ppp.service
4. Configure a DNS server
Add the following line in /etc/resolvconf.conf to use Google's public DNS server:
name_servers=8.8.8.85. Enable the service
sudo systemctl daemon-reload
sudo systemctl enable rpippp.service
6. Reboot the Pi Zero
That's the Pi Zero configured. pppd would now start on boot and try to connect over serial to another computer.
On the Mac
I'm using a Mac with OS X 10.11 El Capitan. This may be different on other versions.
1. Install drivers
The USB-TTL cable may need specific drivers. You should install these and then make sure that the correct device appears when you plug the cable in.
In my case /dev/tty.SLAB_USBtoUART appears.
2. Enable IP forwarding
On the Mac, you need to get the firewall to let you forward IP packets:
sudo sysctl -w net.inet.ip.forwarding=13. Connect the network interfaces
Create a file at /etc/pf.anchors/customNATRules with the contents:
nat on en0 from 192.168.0.100/24 to any -> (en0)
pass from {lo0, 192.168.0.100/24} to any keep state
This is telling the Mac to pass packets from our end of the PPP connection through to our network connection on en0 which for me was my wifi connection. It might be different if you use an ethernet connection or a different wifi card.
4. Link to the new config
Add to very top of /etc/pf.anchors/com.apple:
nat-anchor "100.customNATRules/*"
rdr-anchor "100.customNATRules/*"
load anchor "100.customNATRules" from "/etc/pf.anchors/customNATRules"
5. Activate the network settings
You restart pfctl to activate the new config:
sudo pfctl -d
sudo pfctl -f /etc/pf.conf
sudo pfctl -e
6. Start PPP on the Mac to connect the Pi Zero's serial connection
/dev/tty.SLAB_USBtoUART is the address on the Mac of the USB to TTL converter cable. Depending on which drivers are installed, this could be different.
Running the following long-winded command will connect the serial connection via the USB-TTL cable and assign the other end the IP address 192.168.0.101.
sudo pppd /dev/tty.SLAB_USBtoUART 115200 192.168.0.100:192.168.0.101 proxyarp local noauth debug nodetach dump nocrtscts xonxoff passive nopersist maxfail 0On a successful connection you should see something like:
Fri Jun 17 12:09:25 2016 : rcvd [CCP ConfAck id=0x1]Setting nopersist above will cause pppd to exit when you unplug the USB cable. Set to persist if you want it to stay running and to try to reconnect automatically. Although, if you close the terminal window or restart the Mac then it will exit.
7. SSH into the Pi Zero
I could ssh into the Pi Zero on the static IP I had given it via the PPP link i.e.
ssh pi@192.168.0.101Now you should be able to ping an external IP from the Pi Zero e.g.
pi@raspberrypi:~ $ ping 212.58.246.78
PING 212.58.246.78 (212.58.246.78) 56(84) bytes of data.
64 bytes from 212.58.246.78: icmp_seq=1 ttl=45 time=82.5 ms
64 bytes from 212.58.246.78: icmp_seq=2 ttl=45 time=100 ms
64 bytes from 212.58.246.78: icmp_seq=3 ttl=46 time=147 ms
That confirms that the Pi Zero has a connection to the outside world.
Next, test the DNS is working by pinging a hostname:
pi@raspberrypi:~ $ ping bbc.co.uk
PING bbc.co.uk (212.58.244.22) 56(84) bytes of data.
64 bytes from 212.58.244.22: icmp_seq=1 ttl=47 time=75.4 ms
64 bytes from 212.58.244.22: icmp_seq=2 ttl=47 time=59.3 ms
64 bytes from 212.58.244.22: icmp_seq=3 ttl=47 time=100 ms
Success 🎉!
Conclusion
Although there are quite a few moving parts, having PPP providing a network bridge between the serial port of the Pi Zero and the Mac's network means we can interactively control the Pi Zero whilst it's in gadget mode. This should be really useful for building the types of gadgets that rely on user interaction and are non-obvious in how they behave.
Having another cable isn't ideal though. It would be great if the Pi Zero could behave like several gadgets over the same USB cable at the same time.
Interestingly enough, this blog post suggests that's possible and that'll be the subject for the next post.